ID photo software
Сamera control software
ID card software
info@akond.net, akondsales@gmail.com
| 
| | |
Incardex >> How to work
|
 |
Incardex: how to work
Windows 2000, XP, Vista, Windows 7 (32 and 64 bit), Windows 8
 Buy Buy  Download Download
ID card software - Incardex - is designed for ID card management and printing. Incardex software includes two modules: Incardex Designer and Incardex Producer. Incardex Designer provides an ability to create the ID card layouts, the databases to store information, and create links between ID card entries and database fields. Incardex Producer is used for entering the data and photos and for card printing.
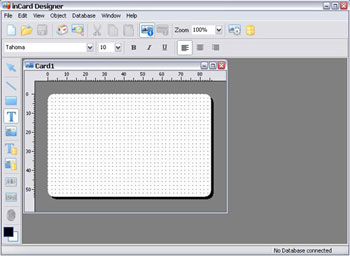
When you start learning and using Incardex the first step is to run Incardex Designer.
- In order to start Incardex Designer click Incardex Designer shortcut on the desktop or select Incardex Designer in Start / Programs / inCardex.
- Create a New Card layout. For this press New button on the Toolbar or click New on the File menu.
-
To create a double-sided ID card click on the Layout Properties button, or click Layout Properties on the File menu, or select Layout Properties in the card context menu (right mouse click on the card). In the Card Type field select Double-sided Card.
|
|
|
Select card background. The card background is also selected in the Layout Properties dialogue box.
If you wish to have full color creative background check Image, press Browse, and select pre-designed card background image file from disk.
To have sinle color background check Color and pick up the color desired.
|
|
|
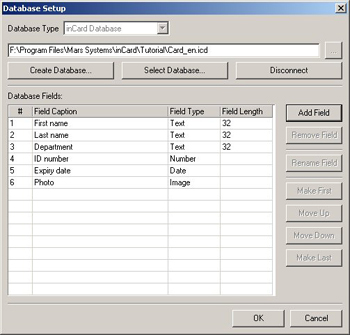
Create Incardex database to store the cardholders’ data or connect to the external database.
Click Database Setup button on the Toolbar or use menu Database / Database Setup. The Database Setup dialogue box appears. Select database type (inCard Database or External Database). Select inCard Database in the drop-down list, click Create Database…, and set database location and name.
Add the required fields to the database, e.g.:
- First name (Text)
- Last name (Text)
- Department (Text)
- ID number (Number)
- Expiry date (Date)
- Photo (Image)
Press OK.
|
|
|
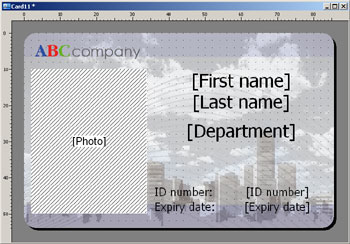
Add the data objects on the card layout and set their properties.
To draw objects select the object type on the Objects toolbar in the left part of the software window and draw the selected object on the card. To set the object properties click the right mouse button on the object and select Properties in the context menu or double click the left mouse button.
Draw the following objects on the card:
- Image from database. In the Object properties dialogue box select Photo from the linked database fields drop-down list.
- Text from database. In the Object properties dialogue box select First Name from the linked database fields dropdown list.
- Text from database. In the Object properties dialogue box select Last Name from the linked database fields dropdown list.
- Text from database. In the Object properties dialogue box select Department from the linked database fields dropdown list.
- Constant text. In the Object properties dialogue box enter «ID number:».
- Text from database. In the Object properties dialogue box select ID number from the linked database fields dropdown list.
- Constant text. In the Object properties dialogue box enter «Expiry date:».
- Text from database. In the Object properties dialogue box select Expiry date from the linked database fields drop-down list.
You may also insert the Barcode, 2D Barcode, Magnetic Stripe, and Fingerprint on the ID card layout. For this use the corresponding buttons on the Toolbar.
|
|
|
Save the ID card layout to .icp file. For this press Save button on the Toolbar or click Save on the File menu.
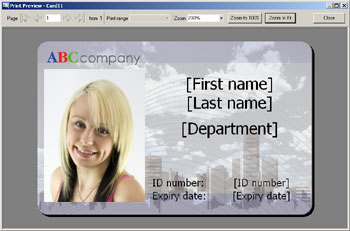
To preview the card to be printed out press Preview button on the Toolbar or click Preview on the File menu.
Now you may close Incardex Designer module.
|
After you created Incardex database or connected to external database, created and saved ID card layouts, you may go to the second step. Run Incardex Producer.
- In order to start Incardex Producer click Incardex Producer shortcut on the desktop or select Incardex Producer in Start / Programs / Incardex.
|
|
|
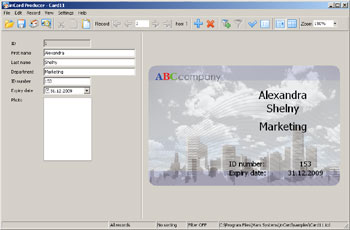
Open the ID card layout. Click Open button on the Toolbar or click Open on the File menu and select created ID card layout (.icp file) in the file open window.
Add a new record to the database. For this click Add Record button on the Toolbar or click Add Record on the Record menu.
Enter data to the First Name, Last Name, Department, ID number, Expiry date fields.
|
|
|
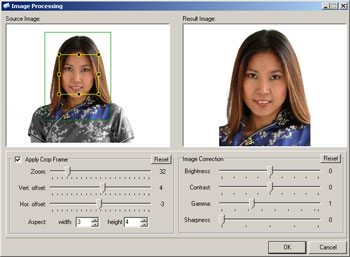
Insert the photo. For this double click on the Photo field and select image file to open. The image file opens in the image enhancement window. The human face is detected automatically, the face area is cropped, and the cropped image is enhanced if necessary (brightness, contrast, gamma, sharpness). Press OK, and the cropped and enhanced image will be inserted into the Photo field.
Install inCard together with inPhoto Capture software, and you will be able to capture ID photos directly to inCard with Canon camera.
Install inCard together with inPhoto Capture SLR software, and you will be able to capture ID photos directly to inCard with Canon SLR camera.
In order to control camera and capture images to inCard select the image source (Menu Settings / Default Data Source or click the right mouse button on the Photo field, and choose Select Source… item in the context menu).
In the image source window select inPhoto Capture TWAIN or inPhoto Capture SLR TWAIN . Double click on the Photo field. inPhoto Capture / inPhoto Capture SLR software starts up.
After the image is captured it will be transferred to the Image Processing window.
Save Record. For this press Save button on the Toolbar or click Save on the File menu.
|
|
|
To preview the ready card before printing press Preview button on the Toolbar or click Preview on the File menu.
Print the ready card out. For this click Quick Print button on the Toolbar or click Print / Quick Print on the File menu. The Print Properties window appears. Perform all necessary adjustments and press OK. The card will be printed out.
Now you have performed all steps required to create an ID card in the Incardex software. You can create the unlimited number of new card templates and databases, and add the unlimited number of records to the database.
|
| | |
|
|